Showing posts with label over. Show all posts

Wednesday, July 27, 2016

WHITE OVER YELLOW french desk

Just a simple update of this cute desk.
It has a single pedestal with 3 good sized drawers and pretty handles.
Ive lined all the drawers in this shabby chic damask paper.
It has little hints of yellow peeking through. 
Read More..

Wednesday, July 20, 2016

Do Over

Been working like my hairs on fire. Just a quick little post to show a re-paint of this solid maple side table.  I guess people arent into peacocks ;)   It sat in my space for a very long time.
So.....Sanded this puppy down and applied a navy latex semi gloss w/gold dipped legs and a new knob
D-U-N
Read More..

Thursday, June 23, 2016

The Hand Painted Dresser How to Add a Hand Painted Element to Your Next Furniture Make Over

Often, I will have an idea of a paint technique or design I want to try on a piece of furniture, before I even have a piece of furniture to paint. That is how it started with this last project. I had purchased a dresser that I thought would fit perfectly an idea I had been carrying around in my head. However, when I got it home and looked at it closer, I really didnt like how the moldings on the drawers were going to break up the very graphic image I wanted to put on it. I walked around for days, taking quick peeks at the piece and trying to quickly give myself a mental snapshot of the image on it. Does that make sense to anyone? Well, I just wasnt liking my imaginary snapshot in my head so, ugh, I decided to bag that idea for later.Now, I knew I wanted to do a hand painted element on this piece, because I was just in the mood for some decorative painting. My design background is in murals and I really find hand painting enjoyable. So, I had to think of something else. So where does a girl go to find painted furniture design inspiration...The Graphics Fairy!The Graphics Fairy is my go to place for inspiration and let me warn you, like visiting Pinterest, you will get off task. You may head there to look for designs for a furniture piece, but before you know it you will find yourself perusing tutorials on how to transfer beautiful french images onto tea cloths!Although I am "groupie" for french typography, I wanted to find some sort of flourish pattern to pick up the curves on the legs and bottom of this dresser. I decided to do a spencerian flourish with a bird. I also decided to do the piece all in cream and white shades. Heres how it all went down.Below is the dresser basecoated in American Paint Companys Chalk Paint in the color Rushmore, a beautiful earthy stone off white.
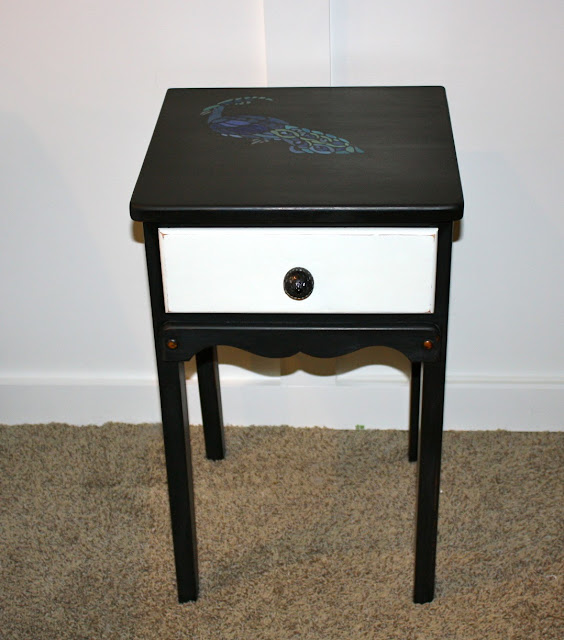
After selecting my graphic from the Graphic Fairy, I decided to transfer my image to my dresser using an overhead projector. If you do not have an overhead projector, another great technique I use for transferring large images is using blockposters.com to enlarge pictures. You can find a tutorial on that at the at the Graphics Fairy here.
tip..I didnt have transparency paper on hand and office depot is over 20 miles from my house, so in a pinch, I print out on a clear sheet protector we had laying around from my kids. Of course it will smear when you touch, but since you only have to use it one, be careful and dont touch it!
To trace my images, I used a watercolor pencil. Find them in the artist section of Michaels or your favorite craft store. Choose a color closest to the color you will be painting with, so I used a white pencil. After painting and when dry, you can just wipe away stray marks with a damp cloth. After you sketch the image up. Gather your painting supplies for the detail work:acrylic paint (you could use latex or whatever else you are comfortable with but for detail work I usually choose acrylics), water to dampen brush and clean, paper towel to dab brush,paper plate for paint, wet cloth to fix any mistakes, and brushesHere is how I usually set up my plate to paint. I poured out some white which was my main color, some Vandyke Brown tint I had on hand to add with white for lowlights (or you could use a raw uber or darker brown acrylic) and my brushes.Because this was more detailed work I used an assortment of smaller sized straight brushes, round and liner brushes and a filbert brush.
I painted the whole mural in white first. To make my brush flow smoothly for long flourishes, I dip my brush in water first and then mix with the paint to make a creamier mix. Sometimes I even wipe the surface with a damp rag so my brush wont drag while moving it, but in this case, I did not want to wipe off my water color pencil!
To create a little dimension, I added the darker accent color sort of as a shadow. Adding it to the inside of swirls and underneath selected brush strokes. Again, mix water with this color to get good flow.
After the mural was painted and had dried. I went over the whole piece with a 220 sanding block to distress. Paying closest attention to decorative details, corners and edges which is where a piece would naturally age first.
I finished the piece with a top coat of American Paint Companys clear wax followed by Miss Mustard Seeds White Wax to give it an overall white wash. (I will be posting a separate tutorial for waxing this piece soon).
Find beauty in your day!
Debbie
Linking to These Fabulous Blogs:
Miss Mustard Seed
The Graphics Fairy
Read More..

Sunday, May 22, 2016

ASS OVER TEA KETTLE union jack

We are well known for our rain here on the west coast. It usually
 rains for a long time but its relatively light compared to other
 places. Last night was a different story. All of a sudden it poured
 like a mid summer Florida storm. I in the mean time was worried
 about some items outside so I went to the top of the deck stairs and
 started down. Well I made it to the bottom however I was no
 longer on my feet. Yes I took a fall the moment my runner stepped
 on the wet stair. My hip landed on the ground, but my rib and wrist
 hit the concrete.
"GEORGE!!!!"
Well he came and got me back in the house and I was banished to
 the bed for the rest of the night with ice.
My hip is bruised, thank god for that extra cheese cake,
 my rib feels fine but my wrist is sore.
So today I had to come up with light duty work.
I also couldnt do my regular job because my PC is gone to Future Shop
to be scolded and straightened out, so here I sit getting familiar with Georges PC.
So today I decided to sit still, let my wrist heal and be a creative painter.
Its a beautiful serpentine dresser call *JACK*.
Hes not done but I am for the night.
I also manage to finish a pair of wooden pillar candle holders made in India.
I got them at a yard sale recently to paint and distressed. The
plan is to take them to the community show next week but youll
 have to wait and see if I can give them up.
Here are the close ups of the accents I promised the other day
on the lingerie chest I finished. Let me know what you think.
Read More..

Thursday, March 17, 2016

French Provincial Make over

 So I found this beat up set off of, where else???  CL.  
These little numbers are pretty hot items around here now. I'm
always on the lookout for someone who just wants to get rid
of it and not hassle w/the selling process. 
Behold this awesome beauty....... 
I know, right??? On the positive side, it was solid wood dove tailed drawers. 
Other than the grease, grime, filth, OMG contact paper and chipping paint, it was in good shape!
I wanted to try something different on this set.  
       Taking my inspiration from Beth over at SawdustandEmbryos, 
I decided to try her staining technique. 
I stripped the top using my Soy gel stripper and sanded with 80,150 and 220. 
                                   First, I drew out some flower petal designs using chalk.
                     Then, I gathered my tools and stain and spent the next 4-5 hours "staining".
I won't go into too much detail because I pretty much went by what Beth did.
Mine looks a lot more "blended" then hers.  It all depends on what final look you are going for.
I used a very small brush to outline the petals so I could keep the lines of the petals separate from
 the neighboring one.  It's not as difficult as it looks. Just a little time consuming.
But I love doing stuff like this. 
      I used Varathane's "Kona" and "Weathered Gray" and some "Red mahogany" thrown in there too.
I love the way the stain turns out when you use it like paint!  This was kind of an experiment. I figured
if it didn't turn out well, I could just paint over the top.  The wood on top of this dresser wasn't exactly
Read more »
Read More..

Friday, March 11, 2016

ITS NOT OVER TILL THE FAT LADY SINGS black harp table

I want to say this was a simple revamp I did on this recent find,
however this piece is anything but simple.
All the ladies in the shop we found this table in, had ideas of
purchasing the table themselves but agreed it was very dated in appearance.
Who wouldnt fall in love with her shape and style.
Some prep work,
A bit of primer,
A little bit of paint,
And a good polish,
has made her sing once again.
I do believe this table was made by a craftsman and is not a
production line manufactured piece making it one of a kind.
This beautifully entry table is currently listed on the AVAILABLE page.
Sharing at:
Funky Junks Sat Nite Special The DIY Show Off
Read More..

Monday, February 22, 2016

MEETING OVER COFFEE desk and chair set

Once upon a time in land far far away
this chair I redid and ....
this table I redid
came to meet after living in the same village for so long.
You see the cool kids didnt like them so they would never
be invited home with them to play.
But when they met each other it was love at first sight and was meant to be.
The chair had been included in a black spray session a few months back
hoping to get some new lookers.
When I saw the table and chair together it only made sense to me to paint the
now desk top to match the chair seat.
I played with my paint color and brushed and sanded against the wood grain
to achieve a similar appearance to the burlap material on the chairs seat.
I then used dark minwax ...
before I hand painted and aged this fun coffee design to the top.
Read More..