Showing posts with label maple. Show all posts

Friday, June 17, 2016

Beachy Vibe Little Maple Buffet

I found this piece of, er, um,,,,,piece at a garage sale around the corner. 
It was a sad, sad little water damaged buffet. But the nice thing
about wood is that it's hardy and forgiving! 
Take a gander at this solid maple beaut...
Yes,,,that thing lying in there is the bottom shelf. The top looked just as bad as the rest of it. 
They were asking $30...I offered 20 bucks.  The two girls nearly threw it at me. 
Should have offered 5. Oh well. 
 I had a bit of left over milk paint in turquoise. I brush a bit here and there on top and then painted the whole thing with CeCe Caldwells White.
Read more »
Read More..

Friday, May 20, 2016

HOW TO REMOVE WATER MARKS blue maple dresser

I love mixing different shades of blue.
This time I mixed equal parts of bright white and Provence, both ASCP colors.
Its a pretty medium blue shade and I am very happy with the finished look. 
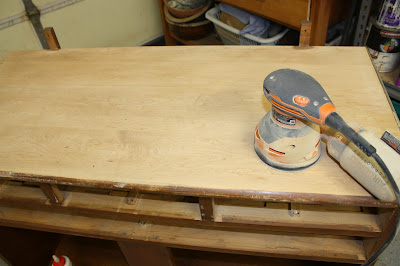
Things are starting to get back to normal around here, normal being a relative term to our way of life.
Lots of power tools, painting, styling furniture, photography, and furniture hunting.
 
In all that hunting I acquired this solid maple dresser that needed some work.
I replaced the broken drawer guides and replaced the missing wood piece.
I have never been fond of the screw covers used on this era of maple furniture,
and one was missing on the leg of this piece, so I fixed that with a cover up.
Now to the reason you came by ...
  *HOW TO*
remove those white water marks from your furniture.
Use a hot iron on a lint-free cloth placed over the stain
moving back and forth.
I did leave my iron in place for some of the more stubborn areas.
Be cautious with your first attempt.
It did take some time for these water marks to come out but it really works.
I also found if I let the area cool between attempts it would work better.
BEFORE ....................................... AFTER
And yes I painted the top in the end but have been waiting for a good piece (or bad) to
show you how to do this.
You can find a side by side before and after pic here.
Sharing with:
The 36th Avenue Photobucket
Read More..

Sunday, April 10, 2016

Ambrosia Maple Pen

Phil (on the mountaintop) from Western NC, an excellent and respected woodturner, sent me some of his cutoffs. Included in this was a piece of what he called "Ambrosia Maple." I think others refer to this look as "spalted."
The Ambrosia Maple will be good for a few pens. Here is the first one. It is intended to be for the wife of my neighbor. I made HIM a walnut pen earlier in the afternoon and did this one in the evening.
These are 3 pictures of the same pen.
Read More..

Friday, February 5, 2016

Maple hutch with tutorial for wood finishing

A big thanks to Maryann at Domestically Speaking, for the heads up on the free paint 
last Sat at ACE! Not That I need anymore paint! Seriously, I counted. I have over fifty...yes 50,
containers of paint in all different colors! But, I didnt have this color!! Since it was FREE, and I already have a bazillion colors on hand, I got COBALT! My fave color. I dont have 
anything to paint this shade....yet! Ima lookin. Isnt it yummy??
MAPLE HUTCH

                 The finished product is at the bottom of this post......Dont peek now...scroll on down!!

          Here is my latest project. A pretty nice score from CL. I dont think the owners ever once polished, cleaned or even wiped this baby down! She was pretty grimy!!
       Im going to go over some wood finishing steps while Im working on this project. I have been refinishing wood a lot longer than Ive been painting it.
  I couldnt believe what a beautiful top the lower part of this hutch had. I know, youre looking at it and going, "yeah, right." Just wait.  This hutch is solid maple. I couldnt believe my eyes when I sanded off that stain. Pure, solid maple butcher block.  Even those shelves are solid. I sanded those puppies down as well.
                                 
                                    I will be adding bits to this day by day until Im finished.
Filling in a crack w/some wood filler.
                             
This left leg had a some serious gouges and a chunk missing from the molding. No problem.
I will fabricate the missing piece with Plastic Wood. It dries quickly and sands easily. The benefit over the wood filler is that it will not shrink and crack. For really big fill jobs, use an epoxy filler.
                         
Read More..
 
Heres what it looks like after sanding and staining.
 And heres what it looks like after painting! I dont think anyone would have known.
And those deep gouges kind of faded after I hit it with sandpaper.
Ok...So off to the top! I start with my orbital sander and a 60 grit, then 150, and finishing with 220.Go easy around the edges or youll hog em off! I usually do those by hand. 
Um, hello??? Can you say pristine maple?? Like butcher block maple quality???Its gawjus!  So now comes the fine tuning with a 320 grit that I use in a block sander, going with the grain. This gets any circularmarks the orbital may have left behind and really gets itfeeling as smooth as a babys behind! 
I used this pre-stain to avoid blotchiness. 
I sand again (with a 320 or 420 grit)  after applying this because it tends to raise the grain.
Maple takes stain very easily although its difficult
to get very dark. I used a dark walnut, which it sucked right up,
and then went over it again with jacobean. I use a foam brush
to apply it and then a lint free rag to work it in and wipe
off the excess.
Very important to use a seal coat. This locks in your color and gives you a
finish you can sand without stripping your color.  You must sand after this
 and all subsequent applications.  From here on out I use a fine steel wool.
Last night I put on a poly finish in gloss, water based. I have the oil based too, but sincethis isnt going to get that much usage, I chose the water. Plus the water baseis easier to brush on and clean-up is with, well, water!  I hatecleaning oil stain brushes! I use a 0000 steel wool. Once the poly dried, I gave the top a once overwith the wooly. Go easy and try to see where the streaks are. Yes, you willdull the finish. Thats okay cuz you are going to put on at least another2-3 coats (sanding in between each one). You never stop at one coat.  A lot of work you say??? Why yes, it is. But thats why it will look so good when its done! 
This is the inside bottom shelf. I gave it a quick sanding, a once over with some stain and one coat of the poly. 
Im calling it a day on this part. It was in decent shape and I didnt take it down to the bare wood. 
I think it looks beautiful. Look at that rich color! 
Heres a sneak peak at the hutch part. I did the same procedure to the shelves as I did on the top. They were the same maple quality. I debated aboutpainting.  I hate covering up nice wood and I thought thecontrast would work well with colors. 
So I just finished the bottom portion and brought this in
the house. Ive since acquired a new piece and I need
room in the garage! Repeat after me,,,,,,
I have a furniture addiction!
I came across these vintage knobs at the Re-Store.The pulls came from Lowes. I tried to spray the originals, but I didnt like the way they came out. I think these suit the hutch better. 
Im so in love with the way this top finished. This is after two coats
of glossy brush on water based Poly. I could probably
use one more coat. 
Ok finally! DUN!  Waxed her up and couldnt find a good placeto put her to take photos. The color of my walls in the other rooms do notgo at all with this hutch. So its in my bedroom by the back door! 
In case you forgot the before.....
I used my home made chalk paint on the white. Behr "divine pleasure".  The aqua color is regular latexwith about 3 different colors I had on hand mixed together.