Showing posts with label summer. Show all posts

Sunday, August 7, 2016

Spring Summer Porch Ideas

Hey there!  Hope everyone is doing well!  Ive had lots of fun the last week or so changing our front porch out for Spring and Summer.  We do a lot of living out there during the summer on warm evenings and nights, so, I really try to pay just as much attention to it as I do the inside.  And its fun, so, why not, right?
Our front porch has been several different colors during the time that we have lived here and Ive never been satisified with any of them, hence, painting them over and over.  Last summer I painted it a very dark chocolate brown, which I really liked at the time of the painting.  Ive come to the conclusion that the reason I liked it so much is because it really did look like dark chocolate while it was in the can and as I was rolling it on.  It was luscious and I wanted to it eat it.  Of course, I didnt.  Anyway, a couple of days after it dried, I hated it, but hubby would have thought I had lost my mind if I painted over it so soon with something else so I just lived with it until now.   At this point, he kind of expects me to change paint colors with the seasons, so, changing it now, wouldnt be so crazy.
This year I decided to do stripes on our front porch, just like I did on our side porch last year.  I already had all the paint, which was white and manchester tan, so I taped off 12 inch sections and got busy.  After it was all dry, I gave it a couple of coats of water based Varathane for high traffic floors.  Water based so it wouldnt yellow over time like oil based does over light colors.  Heres how it looks now.
Pretty sure I wont be changing this because I LOVE it.  I did a couple of DIY projects while decorating this area and I will blog about those later.  First up is this nifty jar candle hanging lanterns thing (for lack of a better word) that I put together with some of my old jars, wire, rope and scrap walnut and attached to the ceiling of our porch.  (ignore the wind chime....I forgot to take it down before taking the photo)
Crazy about that as we sit outside a lot at night and doing that by candlelight will be really special and fun.  I filled the jars with lavender and tea lights.
I love to sit here and chat with my boys about their day or read to my youngest in this cozy corner.  At night snuggling up to hubby here is the best way to end the day.  Theres nothing better.  Or we like to sit here and eat our lunch together.
My color scheme for the porch was taken from the pillows on the swing.  It had light orange, melon, light lime green and very light lavender.  I ordered the large orange dot fabric here.  I ordered two yards and had enough to make a large lumbar pillow for the settee and a smaller pillow for the swing.  That dot pillow just makes me smile.  Its so cheerful and fun, perfect for the porch.
I picked up the ceramic garden stool at a flea market for 15 bucks.  I was thrilled about that because Ive always wanted one but they were just too high.  I cleaned it up and spray painted it white.  It was off white when I bought it and rather dingy, so, I thought bright white would be perfect.
That sucker is heavy!
My hubby collects old minnow buckets and I just love them.  I thought they would make cool planters for flowers and ferns with their splash of color and shiny galvanized coating.  And by using them, there is also a piece of him in the decor, as well.  :)  The only other thing I purchased for the porch was this really cool vintage step ladder.  I wanted something unique to place a fern on instead of just popping it into a plain planter and thought this was perfect.  I had my eye on it at a flea market but wasnt sure about the price so hubby talked them down a little and bought it for me for around 15 bucks as well.  It was red and gross but I loved it anyway because of the X in the back, a design I adore, and I knew I could give it a little TLC and make it into something special.  Ill blog about how I did that later and show you the before pics.
And thats it for the front porch! 
Ill be blogging about the ladder and jar lanterns soon!  Have any of you decorated your porch yet for Spring and Summer?  Have a great weekend!
Read More..

Sunday, June 19, 2016

Back Side Porch Ideas For Summer and An Industrial Pipe Curtain Rod How To

Hey there!  When we first found our home 6 years ago, I was absolutely in love with this side porch off the kitchen.  At the time of course, it looked awful because it was in the middle of being renovated, but, I saw what it could be.  I pictured pots of delicious herbs just waiting to be harvested for cooking, a cozy table to enjoy lunch or a morning cup of tea or coffee, or just a place to sit and read.  Funny thing was, it wasnt until now, 6 years later, that I finally filled the porch with those things.  I have no idea why.
We have a large vegetable garden in our backyard, complete with herbs, so, it never occurred to me to also have some on the porch.  My hubby came home the other day with a crate that he found beside the road that I just loved.  I had it sitting on the porch for a few days waiting until I decided what to do with it when I realized how much I loved it on the porch.  And an idea was born; fill it with unique herbs that I dont have in my vegetable garden, but that I would like to experiment with in the kitchen.
I like to keep the decor on this porch simple, so, heres what I did.
Last year when I made these porch curtains, I just hung them with rope instead of going to the trouble of installing a rod, very rustic and easy.  This year, after seeing industrial copper pipe curtain rods everywhere, I just had to try making some, so, I went to Lowes and priced copper.  Uh....yeah, way too expensive.  So I stood in Lowes for an hour trying to come up with a cheaper way.  Total cost, $25 for two 4 feet long rods.  Heres what I came up with.
 I used PVC pipe and spray painted it with the best metallic copper spray paint.  The quick tutorial will be at the end of this post.
I love how they turned out!  Its like a little surprise inside the porch.
Heres the crate my hubby found.
I filled it with italian parsley, purple basil, chamomile, dill and cinnamon basil.
The hand carved oar is vintage and was found by hubby.
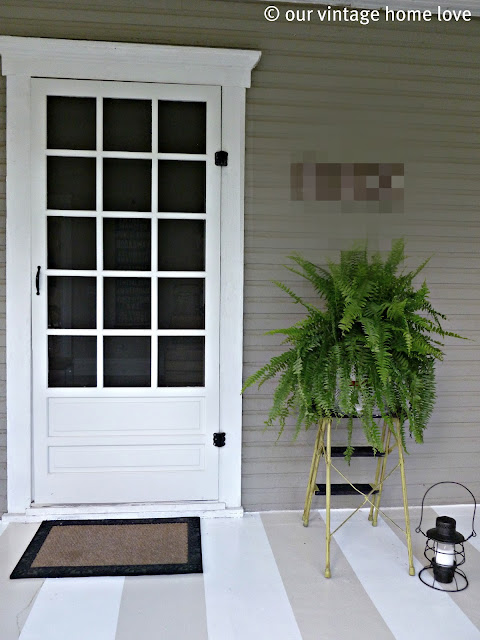
I painted these stripes on our back porch last summer.  They match our front porch, as well.
Hubby also found this metal garden planter.  I didnt care for the brown color, so, I spray painted it with the extra copper spray paint.  The vintage faucet towel rack I made a couple months ago, click here for the tutorial.  It will be the perfect thing to hold my kiddos wet towels this summer from swimming, instead of piling them on the floor.  And is the perfect pop of color.
 And thats it for the back porch!
Best thing is its exactly like I pictured it 6 years ago. :)  Finally....
Heres what you need to make the pvc pipe curtain rods.
Everything was found in the plumbing department at Lowes, except the spray paint.  Its important to note that if you make your rod any longer than about 3 - 4 feet like mine, you will need a middle support as they will droop a little from the weight of your curtains.
I started by cutting the pvc pipe to size and then cutting four 1 inch pieces to use to connect the elbows to the adapter.   Then connect the elbow to the pipe.
Next, connect your 1 inch piece of pipe.
Take your adapter/connector and flange......
Screw the connector into the 1/2 inch flange.
Then connect it to the elbow and pipe.
 And thats it!  Spray paint next!
Make sure that when you spray paint, you spray light coats, keeping the nozzle at least 12 inches from the rod, or the paint will run.  Let dry completely between coats.  I painted 3-4 coats.  Then attach with screws through the flanges.  I dont know the exact terms for these parts, so I hope this is helpful.  I should also mention that I had a nice Lowes sales person help me find the right parts after I told him what I had in mind.  That helps a lot!
See how nice the spray paint goes on, even though its plastic?  Perfect!  And so much cheaper than real copper!  As always, if you have questions, feel free to ask in the comments below or shoot me an email! 
Note:  After your rod is painted and complete but BEFORE you hang it, you can easily pull off the end to slide on your curtains.  Then reattach the end and hang.  Be sure to do this before you attach them to your wall or you wont have a way to put your curtains on the rod.
Ive got so many fun projects going and I cant wait to blog about them all!  And Im still working on those tutorials, as promised!
Have a great day!
Diana
Read More..

Sunday, February 7, 2016

Summer Porch

One of my favorite things to do in the summer is get up early in the morning and sit on the porch swing while listening to the sound of the sprinkler hitting the grass.  That combined with the scent of the freshly watered grass wafting through the air is truly magical for me.  It is my favorite part of the day.  Especially when these girls join me....
There really is nothing quite like a relaxing summer morning.
Truth be told, our porch swing was a little on the uncomfortable, ugly side so I wanted to do something to make the swing just as dreamy.  I came across this photo on pinterest and thought disguising the ugly chain with heavy rope was so clever, not to mention fun and whimsical, so thats what I did.
I picked up the rope at our local farm store and had them cut it to the size I wanted.  It cost me about $10 for 25 feet.  I wanted to have plenty to wrap around the chain on the swing.
Isnt it fun!?  Im so happy with it.  Of course, I had to make some new pillows to make it all comfy too.  :)  So, if youre a detail oriented personal like me and dont like the chains on the swing, heres a great way to hide them.
Our front porch, as well as the exterior of our house, has had some changes and updates that I will share soon!
Take care!  Hope youre enjoying your summer!
Read More..

Tuesday, February 2, 2016

Spring Summer Mantel Ledge

Hey friends!  Yep, Im late to the Spring Mantel party, but better late than never, right?  I decided to decorate our ledge for both Spring and Summer because, lets face it, I dont have time to do it again in a month.  So here it is....
My starting off point was this amazing green colored soda crate that hubby brought home not long ago and I just went crazy for the color!  That crate kinda inspired the rest of the look, with my main color theme being green and white.
I always try to research the things that my hubby brings home, however, I couldnt find much on this crate, or what K.C. Love is.  If anyone knows what it is, do share!  I kinda went with a picnic theme, too, and brought out a couple of picnic baskets from my picnic basket collection.  I love them as much as I love ironstone and bread boards.  They just make me happy and remind me of fun things I get to do with my hubby and kids, past and present.  :)
I picked up this adorable metal green picnic basket not long ago.  I went nuts for the wood handles combined with the green metal.  Ive never been a fan of the all metal variety but this one, with the lovely wood handles, was calling my name.  Love it!
For my main piece of art, I decided to make a sign with this wood/metal thing-a-ma-jig hubby found during Christmas.  We dont know what it is.   It started out like this....
But I decided to give it a new look by sanding it down and stenciling some of our favorite things about summer on it with a vintage set of stencils, also from hubby.  So, now it looks like this...
Everything else, I already had around the house.  I pulled out my favorite ironstone pitchers to display because I love the crisp white color and to add a little farmhouse vibe.  The basket vases of faux greenery, I picked up at a yard sale last year.  I gave them height by placing them on alternating maple and walnut wood scraps that I already had and just cut into squares.  
I made the jar candle lanterns with some old jars I had and wire from the hardware store.  I filled them with fragrant lavender and little tea lights.  Rather than hang them on the hooks on our ledge, I hung them above.  I just thought they looked better there.  Im hoping to find a summery vintage bag to hang from those lower hooks soon.
Im totally happy about this Spring/Summer look!  Im loving the green inspired by that wonderful crate!  And because its finally Spring!
Wishing you all a wonderful Spring!
Read More..