skip to main |
skip to sidebar
This piece was done for my oldest son over the summer. Originally, at his request, I had created a dresser with an American flag on the front. He loved it, but it was a long dresser and it never really fit the space in his room. So, when I found this tall and narrow dresser, I decided to sell the flag dresser. Wanting to try something different from a flag, we decided on doing this new piece in a spin off of the popular numbered drawers, by doing the numbers in German. As a student studying German and with German heritage, this seemed like a fun and fresh look for him. Although, I had to wonder if a woman in Germany was at this time also painting a numbered dresser using the English language and thinking herself original?
Either way, I do love the simplicity of numbered drawers and this design was straight forward and easy to do.
COLORS
Dark blue latex paint in Behr Paint and Primer flat...cant find the color, but will post if I find it!
White acrylic paint
AS clear wax, AS dark wax
First, I printed out the numbers in a font I liked. Then, I traced the numbers onto the drawers using white carbon paper from Michaels.
Next. I painted in the words with white acrylic paint.
I waited until dry and then the next day I sanded the entire piece. Exposing edges and sanding more where natural where would be. I also sanded the words for a more distressed look.
I finished with a coat of clear wax followed by dark wax applied sparingly to add a little more dimension and age.


Auf Wiedersehen!
This post has been linked to:
City Farmhouse, Miss Mustard Seed, Made In a day
I found this darling little vintage desk a few months back.
However, the top could not be salvaged. I thought about scraping it (way too much work) and painting underneath, but I found out it was particle board. So rather than scrape and redo another laminate top,
I though why not just make a solid wood top??!
So thats what I did. I went to the lumber yard and found some solid cherry "shorts" for a song!
You can see where I started to scrape off the top. Fugettibout it!
Here are the 3 boards glued and jigged together getting sanded.
The edges were also routed to smooth them out.
I think I used a combo of stains. I know I did a gel in dark walnut. I might have thrown in some
red mahogany just to brighten it up a bit. Cherry is beautiful!
And here is the desk all put together!
Yes, I painted the "Union Jack" as well!
Oh, and the chair too!
Would this not be adorable in a boys room????
I love the new top better than the original!

If I never have to paint a "jack" again, it will be fine with me! LOL

This beaut is for sale!!
UPDATE>>>>>>I repainted it in BLACK
Linking up to all my faves below plus: betweennapsontheporch.net , my uncommon slice of suburbia, The Dedicated House , new house new home new life, Coastal Charm, The Shabby Creek Cottage, From my front porch to yours, House of Hepworths
George was screaming at the TV during the Kentucky Derby.
Hes been excited about our local jockey and the Canadian owned horse running the Derby,
and sure enough they won!
All while I was painstakingly trying to rebuild this treadle sewing cabinet.
Id been looking for some examples of re purposed treadle cabinets on-line
but to my dismay there were very few to be found.
I knew I wanted to paint the metal base in white but what to do to the rest of it ...
The repairs needed were very extensive and frustrating with all the fragile pieces
that had to be fastened back together.
I eventually got it resembling its former self with a few replacement parts.
I maintained the pedal and wheel so if used as a desk,
you can keep your feet amused and occupied.
I lined the drawers in a white wallpaper.
and a french graphic to the top from the graphics fairy.
 |
| graphic available here |
There is no sewing machine in it anymore and the top doesnt open.
Ive re purposed it into a table to be used as an entry piece, a desk, or even a sofa table.
Read More..
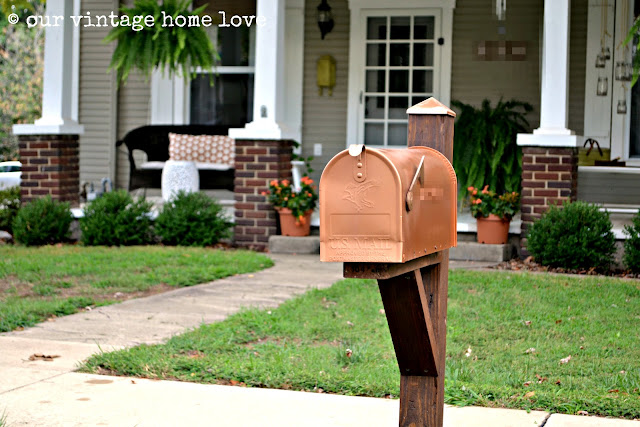
I love a good spray paint project. It is the cheapest way to give something a new look, so, when Krylon contacted me and asked if Id be interested in trying some of their new spray paint, I was thrilled at the opportunity. I chose their new Rust Protector quick drying spray paint in Copper Metallic and Aged Brass Metallic and I loved it.

The timing couldnt have been more perfect as I had picked up one of these copper post caps at Lowes on clearance not too long ago and thought it would be perfect for something,
I just wasnt sure what yet.

Then inspiration hit. Our cheap basic mailbox has been looking pretty sad for the last few years so why not give it a facelift. The spray paint I chose was perfect as it is a rust protector and of course, a mailbox is exposed to all kinds of weather so thats what it needed. I was also pretty happy that I selected copper and aged brass for my choice of colors. The mailbox would also tie in nicely with my copper porch curtain rods.
Heres a before shot of the sad looking mailbox.
Pretty dull, huh? You might be wondering why anyone would care about sprucing up something as simple and basic as a mailbox and the answer is, I would. Im just that kinda gal. I like to think that simple mundane objects, like mailboxes, as part of a home,
deserve to look good, too.
So heres what I did......
As usual, I wanted this project to be as cheap as possible, so we went hunting for some rustic wood, as in, beside the road, free. No problem.
We found a 4 x 4 and a 2 x 4, both dirty and old, just like I wanted.

First I prepared the wood by hosing it off, letting it dry and then sanding it with 180 grit sandpaper. I wasnt going for perfection here, after all, it was going to be outside. Next, I brushed on some special walnut stain and set them aside to dry.

Next up, the mailbox. After cleaning and removing the old number stickers, I spray painted the flag first with the aged brass metallic.

While that dried, I grabbed a package of these.

They are foam letter and number stickers available in any craft store. I wanted to personalize our mailbox and also create an embossed metal look. I added our name to one side and our address to the other side. Then I taped off the already painted flag and spray painted the mailbox with the copper metallic paint. I gave it a good 4 or 5 coats.
It is a fast drying spray paint and it certainly lives up to that.
It was almost dry before I got around to the other side of the box.
Mailbox done.
The next part, building the post, was a bit difficult and I didnt take photos. It took two pairs of hands, which required hubbys help and stopping for photos isnt his thing. :)
After the entire thing was complete, I added the copper end cap to the top of the 4 x 4 post with a little glue and heres how it looks now.

We are pretty happy with how it turned out. And we finished just in time as about 10 minutes after this photo, a huge storm hit. But the spray paint held up great!
I cant wait to add some mums and pumpkins to the base
of it for a little Autumn decoration. :)
Heres a closeup of the foam stickers.

The adhesive on the back is pretty strong so Im confident they arent going anywhere.

This was a pretty fun way to spruce up a cheapo mailbox and I loved how fast the paint dried!
Thanks Krylon!
I am certainly no expert, but here are a few spray painting tips that have helped make spray painting easier for me.
* Always keep your spray paint back about a foot from whatever your painting.
If youre too close, your paint will go on too thick.
* If youre spraying, your arm should be moving. If it isnt,
this will also cause too much paint in a single area which causes the paint to run.
* Its always better to do several light coats instead of one heavy coat in an
attempt to hurry and get it done. I learned my lesson on that one over and over.
* If you have to stop to make dinner or do a load of laundry like me, wipe the excess paint off the spray valve. That way it wont get a weird clog and spray out the side,
painting your face when you resume working on your project. :)
If any of you have any other helpful tips, please feel free to leave them in the comment section and I can add them to this post. :)
Have a great day!
Diana
Virginia over at LiveloveDIY made this gorgeous wreath and hung it in
front of her gorgeous mirror! Love this. Had to copy. She gives the how-to's.
I would kill for this mirror! She did a beautiful job turning it silver.
I hate to show mine next to hers! ;(
Oh well, it's my first. got all the bulbs at Big Lots.
Read more »
Ok. So now the first campaign debacle. This is the Baker piece. Scored big time on this one. 15 bucks! Had no idea until I did some research. Its a well made piece, obviously, that had belonged to the sellers mother. People, it has been sitting in the garage for months. I just couldnt decide what color to do. I will be keeping this piece because it is such a nice quality.
The wood is bleached walnut. And it needed some TLC. If the wood was great, I would have have kept it natural. So all you wood people, dont hate! I love me some good wood and dont just take a brush to every piece of furniture I see. Some pieces I refuse to paint. So there! pfffffft!
I thought I would try my new milk paint since I sanded this puppy down to bare wood. Or so I thought.
And here is where the debacle begins.

Thought I would try the nice blue. The drawer looks nice eh? So after sanding and a coat of wax, this is what I was left with. Um, no. Not the look I was going for.
Way toooooo chippy. Antique, yes. 60s vintage, no.
Sigh. Break out the sander and start over. Thank god milk paint sands off easily.
The drawer fronts actually have some nice wood grain going on. I decided to keep those and stained them a dark walnut. The wood on the top was just not good quality, trust me. The grain was blotchy and wonky. I tried staining it, but it looked awful. So I will paint everything but the drawers.
They cleaned up nicely!
Now the dilemma. I still cant decide on a color. This will have to be a semi or glossy finish.
I had thought about an oil based white in glossy, but if I dont like it, it will be too difficult to just
"paint over". Black seems, well, too severe. Gray, too blah. Red, getting away from red in the house cuz Im tired of it. Green, nah. See what I mean? I cant decide.
Any input would be welcomed. I plan on redoing my living room by using some gray on the walls
and some sort of blue (anything from aqua to peacock,,,,havent decided on that either!) for the other color.
PART II..........after reading a few comments:
So after reading Rachels comment, I decided to try out MS "Plumage" with a little Lagoon mixed in. Here it is on the edges. ?????
The color above is without the flash. The pic below, the flash washed out.
See what I mean about the wood on the top???? Looks like a map of the world.
After stripping off the other paint and sanding with a 220, I coated the bare wood with this seal coat.
It makes all the difference when its time to paint. The paint goes on so much easier than on bare wood. The finish will look smoother as well. In fact, any time you stain wood, you should use
a seal coat to lock in your stain prior to applying your finishers. This will not affect the top finish.

And Lesley, I agree, yellow would be very pretty as well! Especially with the gray.
There are so many great colors! Im still on the fence.
I think I will go peruse the Ben Moore paint selections tomorrow and see if anything
jumps out at me!
Thanks everyone.....
And here is the finished piece! Read and see more here


 Happy Sunday to you....