skip to main |
skip to sidebar
I wanted to share a few more items I have reclaimed out of all my bits and pieces
saved from my furniture escapades.
First are these fun beach themed wall hangers, does anyone recognize what they are made from?
They have metal star shaped knobs to hang from, i.e. towels, keys, coats.
If I had a poolside thats where they would be hanging now.
One of my favorite reclaimed items is the plaster molding hooks.
As promised over on our FACEBOOK page I completed some with vintage glass door knobs.
An finally another large set of pillar candle holders, painted and distressed in bright white and
built from bed parts, drawer faces, and embellished with Fleur DE Lis.
Many ppl that are not local have asked how to
purchase some of these smaller items, we are dabbling in opening an Etsy shop to provide anyone with the ability to purchase some of the smaller items I reclaim.
I will keep you informed.
My sister dropped off some picture frames so I thought I would
up-cycle them into chalkboards and little message/jewelry hanging thing-a-ma-jigs!
I painted with chalk paint, waxed, attached fabric and some chicken wire
and....here ya go!.....
There will eventually be a second part to this post
as this cute antique chair has a partner.
They were both painted using blue and white chalk paint.
The first thing I did was to remove the trim around the upholstery.
George actually did it while I was painting something else.
Every now and then he likes to help when he can.
I painted the frames in old white first,
then adding a coat of Provence (blue)
I sanded the blue Provence back to expose the old white and the original wood.
I also did a bit of washing with water to lighten and blend the colors,
before removing the velvet upholstery,
A lot of the nails were removed but some were hammered in.
It all depended whether they would be in the way of the new staples and upholstery.
When I purchased these pieces I knew I was going to use a
white quilted coverlet Id been keep for the right project.
I also had a handful of cording that I purchased recently
at a yard sale that would go perfectly with it.
Normally this cording I pulled out of the pile would be sewn into a seem
but when I held it up to the project I liked the way it looked.
I love how every aspect turned out especially the quilting against the layer of colors.
Old things do get creaky over time.
So some stiffening did have to be done to the frame with screws and glue.
I added new foam to make them soft and comfy.
The entire frame was waxed before the upholstering was started.
I used the edge of the coverlet to make the skirt around the chair.
I prefer the look of the skirt on the outside of the legs,
Its like she is showing us a little leg from underneath her dress.
Here is her partner,
did you think it was another chair?
Watch for when this majestic guy gets turned into a princess,
as opposed to a frog into a prince!!
Read More..

Im an impulsive person. When I think of something, I must do it.
And then, when I think of something else, I must do that as well.
That leaves me doing a lot of different things and sometimes at the same time.
So, where am I going with this? Well, I find that my impulsivity affects my painting. When I want to start painting a new piece of furniture, I want to start painting.
I gather my brushes and other supplies, open my paint can and begin. And this, lack of planning has led to some problems, particularly with chalk paint.
You see, I like to paint directly out of the can. In my flurry to begin my project, pouring paint into another container would slow me down, it would be messy and I am certain it would interrupt my creative process. So, I paint out of my can, dipping and wiping my brush along the side.
But...this is what I end up with.

The paint that I wipe along the sides ends up drying along the lid. The lid never fits tight after that and eventually, the paint remaining inside thickens. At almost $40 a quart, this is a waste! So, I figured if I wanted to enjoy the spontaneity of painting out of a can,
I had to come up with some ways to preserve my chalk paint.
3 Ways To Protect, Preserve and Store
Your Precious Chalk Paint
1. Create a temporary and reusable lid with an old or new Ziplock twist lid...they fit perfectly!!
Creating a temporary lid gives me a lip to catch the paint on,
without getting any paint on the actual rim of the can.
Here, I used a hot tool with a blade to cut a circle
leaving about a half inch rim to catch the paint.
You can also use scissors if you carefully drill a hole in the center and cut outwards.
Just eyeball the circle. It does not have to be perfect.
Plop this on your can and as you paint it will catch all your paint. When finished painting, remove it, rinse it and save it to reuse.
This is how my new can of paint looks after using the zip lock lid. Much better.

2. With my rims clean from the storage lid, my paint can be kept safely in their original cans. However, when my quart of paint starts to run really low, I sometimes like to move what is unused into empty mason jars. They store paint air tight and they look pretty. Mason jars can just do anything with style!

3. Finally, another way you can keep your chalk paint fresh is with Annie Sloan storage lids.
These look wonderful. They are only $4.95 each and can be purchased at one of my favorite sites, www.thepurplepaintedlady.com.

Now, no more dried out paint:)
So I got a phone call regarding one of my items for sale on CL from a guy who wanted to
surprise his daughter by re-doing her room. She is 19 and coming back home from school.
I happened to have had these two guys sitting in the garage and told him I could have them done
by Sun before Christmas (This was the prior Monday, btw!) He gave me free rein on what to do, but just keeping it in the white/neutral family..
Sorry for the garage pics. I couldn't stage these because I literally just finished when the customer
drove up to take them home.
Use your imagination!
This dresser was a American of Martinsville that I have kept pushing aside for 8 months! So glad I waited! It's a beautiful well made piece.

I have already done the twin to this one...here.....He told me he wanted it to coordinate with the dresser.
Told me to paint whatever I felt like doing.

I love the cherry blossom stencil (Royal Design Studio for the stencil and their bronze stencil creme)
and thought it would perk up the blah flat front. Their stencils are great to work with and I
absolutely love the creme. A little goes a long way. This cherry blossom stencil comes
in 5 different sheets so you can pick and choose how you want the branches laid out.
The top was done in a dark walnut.

I made my own chalk paint using "Divine Pleasure" by Behr. It's such a pretty white.
Read more »
While out and about a couple of weeks ago doing our garage sale thing, we found this sofa table-coffee table-not sure what kind of table, for only 5 bucks. Well, we sure couldnt pass that up and turns out it was perfect timing.
Ive been gathering pieces here and there to start redoing our oldest sons room. My first born is 19 soon to be 20, going to college and working and I thought it was about time to give him a more adult room. His room is the last on our bedroom design agenda, so, Im pretty excited about getting started on it. It has looked the exact same for the last 6 years and I know he is ready for a change.
One of the things I needed to find for him was a bedside table and so I thought, why not turn this table into one. The top of the table is just awful. Paint, oil, gunk, and a thick lacquer type top coat. Heres a couple of shots of the table when we brought it home.
Its very retro and cool. And here is a close up of the nasty top.
When I first saw it, I said to myself, "self, you are going to have to sand that thing for 97 hours to remove all that gunk on top of it." But then, I looked underneath........
Underneath the wood was absolutely beautiful and in its raw natural state. Why someone would want to cover this up with all that other stuff is beyond me. What I decided to do was remove the legs and flip the top. Perfect!! And no sanding!
The legs were dirty and rusty but with a little work and some sandpaper,
I brought them back to their original retro condition. Next, I cut a 20 inch long piece from the center of the original tabletop to be the top of the new bedside table.
After reattaching the legs to the opposite side of the newly cut piece,
I got to work on the top.

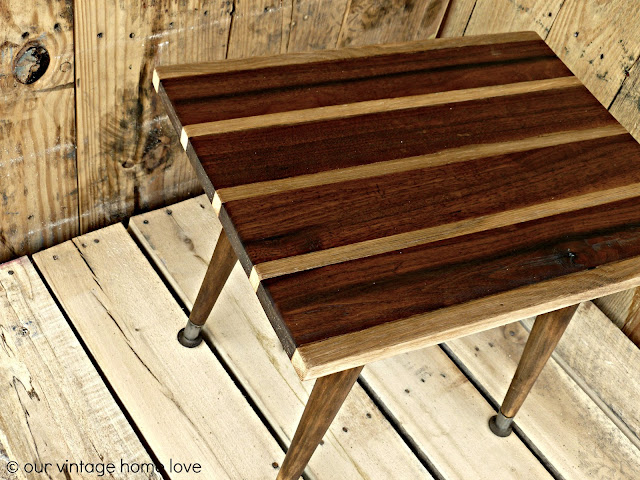
What I really liked about this table was that it was solid wood. To be more specific, it was walnut with narrow oak pieces joining them where Ive shown with arrows. I loved that, so, what I wanted to do was highlight the two tone effect of the wood. First, I sanded the top just to smooth it out.
As luck would have it, the strips of oak were the exact same width as my masking tape, so next, I taped off the strips the arrows are pointing to so I could apply raw dark tung oil to the wider walnut pieces in between. The oak pieces I wanted to leave as is. The purpose of doing this was to make the walnut stand out a little more to emphasize the two different types of wood. I got so excited at this point, I forgot to take photos of those last couple of steps.
I applied the raw dark tung oil very carefully with a rag and then removed the tape immediately. Ive done this with paint many times but never with oil, so, I wasnt sure if it would bleed or seep through the tape or not. It didnt and I was thrilled with the look! After I let that dry, I coated the entire top with finishing paste wax in natural. And ta-da!!
The table got its own little photo shoot outside. Next time, I will remember to wipe the crumbs from the cookie I was eating while taking photos, off the table. Im not ready to put this into my sons room yet cause I havent started painting. But I did want to go ahead and share it with you. Youll see it again when I blog about the room redo.
Isnt it cool and retro and perfect?! Here is a closeup of the top.
I absolutely love the two tone effect! Here is one more before and after....
This was So. Much. Fun!! And this totally has me inspired to get busy on the rest of his room!
Have a great day!
Read More..


 Read more »